
Most people proscrastinate when it comes to an actual commitment to learning yoga. Everybody knows it is a great de-stressor. Everybody is aware it can tone up the body like no other physical activity can. Everybody knows the bonus also means robust health and great joie de vivre. Yet...
If you belong to this let's-do-yoga-tomorrow group, here is how you can break the pattern of proscrastination. Given here are 12 easy-to-learn, do-it-yourself poses that should get you in fine fettle and whet your appetite for the challenges of yoga in coming months.
Tips for beginners
The following poses start off with easy-to-do ones. Do some warm-up before you start with each pose. This will prepare the joints and legs for the pose, affecting the body deeper. Always relax in the corpse pose or shavasana (on your back, with eyes shut, legs and hands spread slightly) after each pose and at end of your practice session.
Here, Shameem Akthar, yogacharya trained with the Sivananda Yoga Vedanta Center, shows you 12 easy ways to a yogic sadhana or practice.
For more of Shameem's yoga writings and workshops log on to http://jaisivananda.blogspot.com.
(This column only seeks to share the author's enthusiasm towards yoga. Yoga is best learnt under expert guidance.)

Sit up straight. Bring the soles of your feet together. Holding your soles with your palms bring them as close to your groin as possible. Now flap your knees a few times up and down, to loosen your hip joint. Relax. Inhale and exhale consciously and deeply a few times.
After having flapped your knees up and down about 25 times, you may press your knees down firmly, trying to touch the ground. Keep breathing, holding the pose as long as possible. Release. Do thrice.
Tips for beginners
Don't take the feet too close to the groin region initially. Keeping your legs loose takes the strain off the saddle region which can be very stiff for beginners.
Benefits
It helps release fat from liver, thus controlling weight problems. It impacts the uro-genital system, helping with related ailments. It elevates mood. It is used, along with such forward-bending poses, to control anger, anxiety and stress.
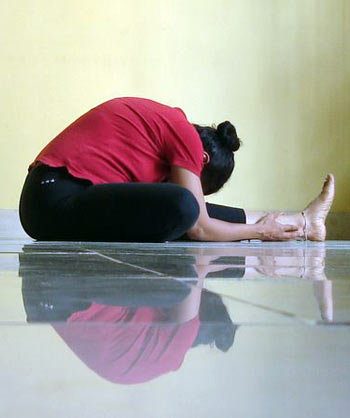
Sit on the floor and extend your legs. Bend your right leg at the knee and place your right sole against your left thigh. Inhale. Raise both your hands. Exhaling, lower your hands to your right foot. Simultaneously, lower your head to place it on your right thigh. This may not be possible initially, so just lower your head as much as you can. Continue normal breathing throughout. Inhale, raising your head and hands to return to the starting position. Repeat thrice. Then repeat the entire sequence for your left leg.
Avoid
In case of lower back problems and high blood pressure.
Tips for beginners
If you are very stiff, then place a bolster on your extended leg, and place your forehead on it. This way you can hold the pose for long. After a few weeks you can replace the bolster with a cushion, as your spinal flexibility improves.
Benefits
Body-mind tension is ironed out gently. The pressure on the abdomen helps rejuvenate the islets of Langerhans, the pancreas and adrenal glands. Is soothing due to increased blood flow to the head and improved belly-breathing.

Sit up straight, your back erect and shoulders relaxed. Spread your legs as wide as you can comfortably. Again adjust your back, it should not be slumped. Place your hands on your thighs, palms facing up. Shut your eyes. Stay in this pose for a few seconds initially. Keep increasing time in the pose as your comfort level increases, up to a minute or so.
Tips for beginners
Those with breathing problems may feel slightly breathless in this pose. Sit on a firm cushion to take the pressure off your respiratory system. Bending your legs lightly at the knees may also reduce the pressure of the pose. Though seemingly simple it becomes difficult to hold for too long, so lean against a wall initially.
Benefits
The pose tones the pelvic region, powering the muscles. The blood flow to the area is enhanced, aiding repair. It is said to boost mood due to the normal flow of the sexual hormones. Legs become shapely. Boosts respiration, again affecting the mind positively. Also calms and de-stresses.
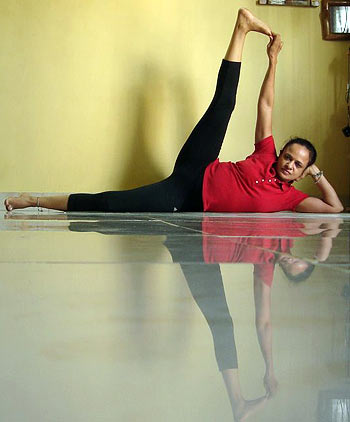
To do this pose, lie on your left side. Adjust your position, so your body is aligned in a neat line. Rest your head on your folded arm. Inhale. Exhaling, lift your right leg up. Reach with your hand to hold your leg where you can. Breathe normally. Hold for a few seconds. Release. Repeat up to five times. Release. Now switch to repeat entire sequence for the other side.
Tips for beginners
Initially you may not be able to balance on your side. So, use a wall as back support while attempting this pose. If you are unable to lift leg up to 90 degrees, you may lift up to capacity only.
Benefits
Strengthens the entire leg, stretches and powers the major muscles around the knee, increasing its support. It also hikes metabolism. It is a mood-elevator, and thus good for those with auto-immune problems. Is useful in alleviating uro-genital problems also.
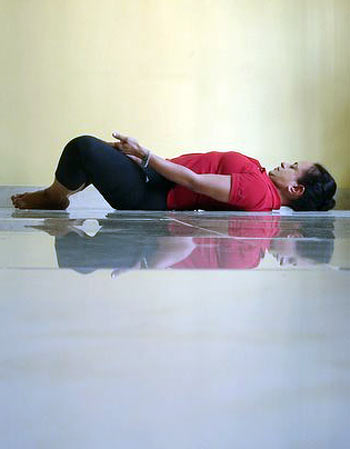
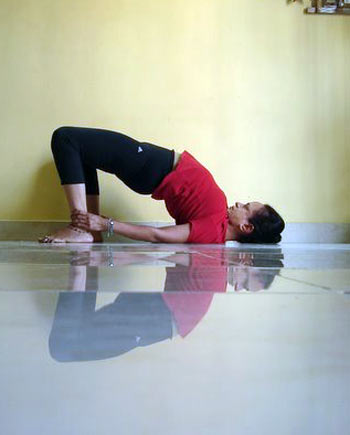
Lie on your back. Fold your legs at the knees, placing your feet flat on ground beside your hips. Grasp your ankles with each hand. Inhale and hoist your hips off the ground. Exhale to gently lower them back to ground. This is one round. Do five to ten rounds initially, increasing either duration in the final pose (in which case, you must continue normal breathing throughout) or increasing the number of rounds.
Relax back in the corpse pose, body on ground, feet apart, hands away from body, eyes shut, for a few minutes.
Tips for beginners
In case you cannot grasp your ankles initially, just place your palms flat on the mat where you can, before lifting your hips.
Benefits
Works on the thyroid gland powerfully, boosting metabolism. Powers the lungs. Tones hips, thighs and legs.
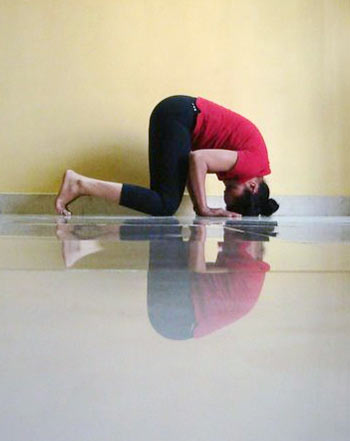
Sit on your heels. Exhale. Kneeling down, lean forward to place both your palms flat on the ground so now you are on your fours. Continue breathing. Gently place your crown on the floor/yoga mat. Use a towel (under your head) so that you don't feel any discomfort. Roll further, so that your neck locks between your collar bones. Keep your back up instead of slumping. Your hips should also be up. Stay in the pose as long as is comfortable, breathing steadily throughout.
To release, sit back on your knees, raising your head. Roll your neck to the left side and right side gently to release any tension. Over six weeks you must steadily increase the duration in the pose from a few seconds initially to at least a minute. Increasing the time further, to two minutes or more, is advised if diet control and weight loss is your goal.
Avoid
If having severe neck pain, or high blood pressure and cardiac problems.
Tips for beginners:
Use a towel (under your head) so that you don't feel any discomfort.
Benefits
It massages the master glands in the brain, that in turn control hunger pangs and satiety buttons. The neck lock hikes metabolism, aiding efficient use of food and nutrients, plus encouraging fat release. The increase in respiratory rate (more breathing, as if you have been exercising hard) and the increase in heart rate (which replicates a good round of aerobic exercise) also make you sweat very hard suggesting that fat-burn effect is a matter of immediate experience. It also helps with psychosomatic ailments, suggesting that our emotional triggers to food may be suppressed with its regular practice.

To do this, lie on your back. Fold your legs at the knee, placing your feet close to your hips. Place your hands alongside your body. Place one of your hands on your belly. Start counting your breath backwards starting from 300. Count one inhalation and exhalation as one breath, starting with Inhale 300-exhale 300, inhale 299-exhale 299 and so on, till you arrive at inhale 0 and exhale 0. If you forget your count, restart from 300. This is to ensure that your mind remains firmly on the counting and your breath.
This exercise is not just a basic yogic breathing practice but also a powerful meditative exercise. As you focus your awareness on your breathing, you will notice that the erratic flow of your breath disappears as your breath settles down to a more soothing rhythm. This entire exercise, which may last up to five minutes, done regularly and daily for six weeks, can boost your respiratory capacity powerfully due to what is medically referred to as ventricular infusion.
Benefits
This may be practiced during any ailment: it will not only aid with pain management but also boost recovery faster by encouraging the parasympathetic nervous system. It encourages the lungs to breathe fully, reaching into its lower areas normally not touched. Most of us unfortunately do clavicular or upper lung breathing, not utilising the full capacity of the lungs. This practice also prepares us for meditation. It de-stresses.
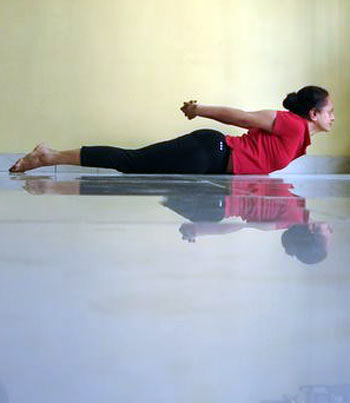
Lie on your stomach. Place your hands on either side of the shoulders, with your chin on the ground, legs close, lightly touching. Place your hands behind you, interlocking your fingers. Inhale, lifting your chin off the ground, simultaneously lifting interlocked hands behind so that they are off your back. Ensure both hands are tautly stretched. Continue breathing, pushing your chest up to hold the pose as long as is possible. Release with an exhalation, gently bringing your chin back to ground, releasing your hands back to the ground, near either shoulder.
Rest on your stomach, eyes shut, hands over each other, one cheek rested on the back of your hands, breathing normally (in the pose called makarasana or crocodile pose).
Tips for beginners
Initially do not lift your hands up too high since that involves upper back strength that needs time to develop.
Benefits
Removes emotional blockages. Ups mood. Aids in respiratory ailments, powering the lungs. Heart and immune system are both impacted. Face becomes younger due to the powerful stretch from neck upwards. Spine enjoys a powerful traction.

Sit back on your heels, your feet slightly apart. Hoist your hips up, so you are resting on your knees. Inhale, exhale. Inhaling, tilt lightly back to reach for your right foot with your right hand. Your left hand should be stretched out. Keep looking at your hand in front, breathing normally. Release. Repeat for the other side.
Avoid
If having knee pain.
Tips for beginners
If unable to reach your hand behind to rest on the ankle, you can place both your hands at your hips for support and tilt back slightly.
Benefits
This preparatory pose promotes stamina and spinal flexibility. It opens up the chest, to improve breathing. Is therapeutic in diabetes, metabolic problems, fights fat, tones limbs. Offers relief in constipation.

Kneeling down, sitting back on your heels in the classic thunderbolt pose or vajrasana. Sit up straight. Place your left hand on your right hip or knee. Inhale. Exhaling twist towards your right side, feeling the stretch powerfully along your spine and abdomen. Hold for a few seconds, breathing normally. Release and repeat for other sides.
Beginners can try this pose thrice. Advanced practitioners can do it just once, but hold longer, for 15 seconds or more, breathing normally throughout.
Tips for beginners
This pose can also be tried by sitting in a simple cross-legged pose, called sukhasana (easy pose), or even on a chair, if you have knee problems.
Benefits
Powers liver detoxification, boosts metabolism that aids nutrient absorption for healthy skin. Squeezes out stress that can worsen skin problems. Boost respiration, aiding oxygen transfer to skin.
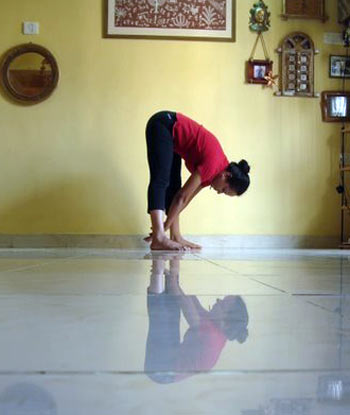
Stand up straight. Spread your legs, with your feet about a meter apart. Raise both your hands, inhaling. Exhaling, swing your torso and hands low, so your hands move between your legs. Take care to maintain your balance. This is one round. Do up to 10 to 15 rounds. To finish the pose, return to the standing position.
Tips for beginners
Do this very slowly. Also, the focus should always remain on your feet, since you are likely to lose balance otherwise.
Benefits
Improves respiration, clears lungs of congestion. Boost circulation, removes dullness from the body and mind.